
PBX Admin Guide - Working with Automated Attendants
6. Working with Automated Attendants
Automated attendants (“auto attendants”) are automated greetings with options to route calls. The SkySwitch PBX Portal has an auto attendant builder that gives you easy access to change recordings and options anytime.
The Auto Attendants list displays each auto attendant. From the Auto Attendants List, you can edit auto attendant settings and record the auto attendant greeting.
- Displaying the Auto Attendants Page
- Adding Auto Attendants
- Editing Auto Attendants
- Deleting Auto Attendants
- Auto Attendant Best Practices
Displaying the Auto Attendants Page
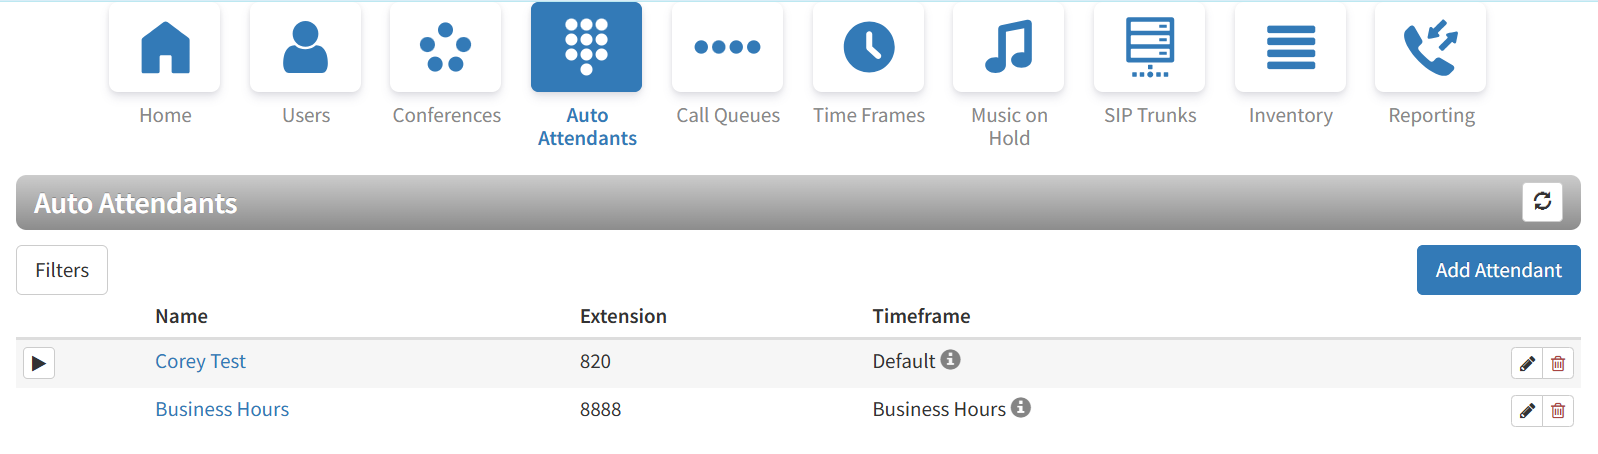
All auto-attendant tasks are performed from the Auto Attendants page. To display this page, click the Auto Attendants icon  on the menu bar.
The following figure shows an example of the Auto Attendants page. The  button at the top-right side of the page refreshes the information on the page.
From the Auto Attendants page, you can:
- Add attendants.
- Edit attendants.
- Delete attendants.
Adding Auto Attendants
The following procedure describes how to add auto attendants.
- From the Auto Attendants page, click the Add Attendant button. The Add an Auto Attendant pop-up window appears.

- Complete the fields (see Table 6-1 below).
- Click Continue.
- Complete the fields (see Table 6-2 further below).
- Click Save.
Table 6-1. Adding/Editing an Auto Attendant (Page 1)
| Setting | Description |
|---|---|
| Name | Enter a name for this auto attendant. The name should allow you to differentiate this auto attendant from other auto attendants you configured. |
| Extension | Adding an auto attendant: select the extension used with this auto attendant. Editing an auto attendant: read-only field that shows the extension. |
| Site | (Optional) If applicable, enter the name of the Site (user group) you wish to associate. |
| Time Frame | Select a time frame to which this answering rule will be applied. The choices shown are the ones previously configured using the procedure under section “Adding Time Frames." |
It is considered best practice to use default or always time frames for auto-attendants. Otherwise, you’ll have to carefully ensure that the time frames are consistent in the entire call flow. Routing to an auto-attendant with an inactive/different timeframe will result in a call failure.
This is applicable in the following scenarios:
- Sending calls from a routing user with multiple time frames to different auto-attendants
- Chaining/linking multiple auto-attendants
Caution: Once a Time Frame is deleted, it will not revert back to default settings. Time Frames must be set in order to function. Please remember to add a Time Frame after one is deleted.
Table 6-2. Adding/Editing an Auto Attendant (Page 2)
| Setting | Description |
|---|---|
| Auto Attendant Name | This is the auto attendant name you entered on the previous page. Use this field to change the name if desired. |
| Extension | Read-only field that shows the extension associated with this auto attendant that you entered on the previous page. |
| Intro Greetings | Click the icon to display the Manage Greetings pop-up window and play, upload, record, or delete greetings. |
| Menu Prompt | Click in the text box or click the icon to upload or record a menu prompt. |
| Dial Pad Menu | Route calls to one of a variety of resources when a caller selects that option. Click a number, and then select an application from the following pop-up:
|
| Options | Click this button to open a pop-up window with the following options. Click Done when finished.
|
Recording Intro Greetings and Menu Prompts
Each auto attendant can have an optional introductory greeting that plays when a call is directed to the auto attendant followed by the menu prompt. An example of an introductory greeting might be:
"Thank you for calling Acme Corporation. You've reached us outside normal business hours. "
“Press 1 for sales, press 2 for marketing, or press 0 for operator assistance. ”
Separating intro greetings from menu prompts allows you to change greetings for holidays or night-time hours, for example, without re-recording the entire message.
To record an intro greeting:
- From Auto Attendants page, click the Manage button
 next to Intro Greetings. A Manage Greetings pop-up will appear.
 - From this pop-up window:
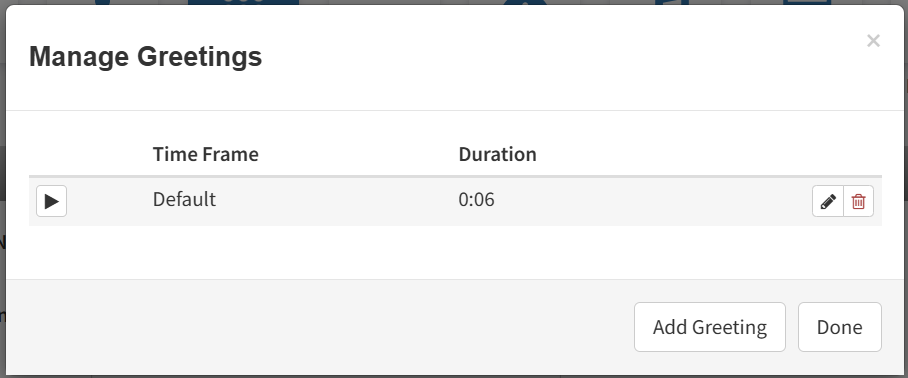
- To play a greeting, click the play
 icon to the left of the greeting name.
 - To edit an existing greeting, click the edit
 icon found at the right of the greeting entry. The options will be the same as when you add a new greeting.
 - To delete a recording, click the delete
 icon at the far right of the row. At the confirmation prompt, click Yes to delete the recording or No to retain it.
 - To add a new greeting, click the Add Greeting button and additional options will appear for the new greeting.
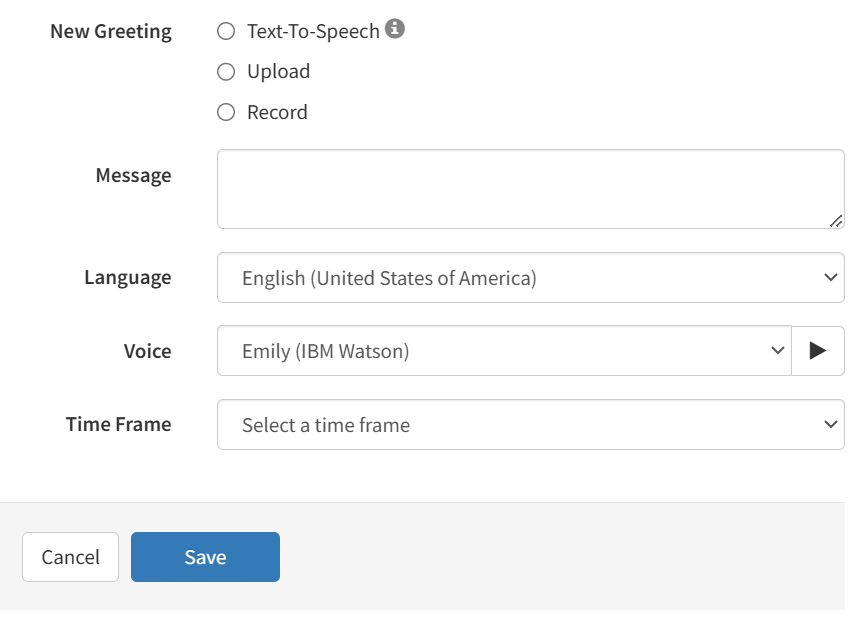
- Text-To-Speech - the greeting audio will be generated automatically based on the Message text you input, the Language chosen, and the Voice to use. The Time Frame chosen will determine when this greeting will be used. To learn more about this feature go to the PBX Text-to-Speech article. When done click the Save button.
- Upload - use this option to upload a file for use as your greeting. Click the Browse button. Navigate to the file, click the file, and click Open. Click Upload.
- Record - if you select this option, enter the number to call (either an extension or a telephone number such as your cell phone) and click Call. Your phone will be called. At the prompt, record the new greeting, and then press # when you finish your recording.
- To play a greeting, click the play
- When you finish, click the Done button.
- From Auto Attendants page, under Menu Prompt, click the
 icon next to the field. This displays a Manage Audio pop-up window.
 - Complete the fields (see Table 6-3 below).
- Click Save in the Manage Audio pop-up window.
Table 6-3. Manage Audio Settings
| Setting | Description |
|---|---|
| Description | Enter a name for this greeting. The name should allow you to differentiate this greeting from other greetings you recorded. |
| New Greeting | Select whether to use text-to-speech, upload, or record a greeting. Greetings must be in MP3 or WAV format. Choices are:
|
Editing Auto Attendants
There might be times when you need to edit auto attendants.
- From the Auto Attendants page, either:
– Click the name of the Auto Attendant you want to edit
OR
– Click the icon at the far right of the Auto Attendant you want to edit. Either step displays a pop-up window.
 - Complete the fields (see Table 6-2 further above).
- Click Save.
Deleting Auto Attendants
If you no longer need an auto-attendant, you can delete it from the system.
- From the Auto Attendants page, find the name of the auto attendant, and then click the
 icon at the far right of the entry. A confirmation prompt appears.
 - Click Yes to delete the auto-attendant or No to retain it.


Auto Attendant Best Practices
When configuring your auto attendant, observe the following best practices:
- Consider your callers. Do they know with whom they want to talk or what function they need (customer service, sales, and so on)? Taking your callers into account will help you determine how to configure your auto attendant.
Note: If you would like to change the directory sorting order from LASTNAME to FIRSTNAME, you may use the 'PORTAL_USERS_DIR_MATCH_FIRSTNAME' UI Config. For more information, please refer to our UI Configs: Auto Attendant Article.
- If callers know with whom they want to talk, assist them by providing options such as:
- “Dial your party’s extension at any time. ”
- “Press x for a dial by name directory. ”
- “Press x for the first available person/general voicemail. ”
- “Press 1 for Bob, 2 for Susan, ” and so on. However, this approach does not scale well.
- If callers do not know a specific person but need a function, provide options such as:
- “Press x for a dial by name directory. ”
- “For sales, press 1. ”
- “For customer service, press 2. ”
- “For accounting, press 3. ”
Note: Try to keep greetings brief. Do not flood callers with too much information (hours, directions, fax numbers). Instead, place that information into a “play message” option.